0. 视频和项目
b站地址:042-案例20-集成dubbo-1_哔哩哔哩_bilibili
本地项目文件:/Users/mac/IdeaProjects/pro001/pro002
1.详细笔记
1. 创建一个springboot框架的web项目
New Module - spring initialize (java8+jdk1.8) - 选择spring web依赖
注意pom.xml文件,是maven spring mybatis等依赖配置和插件配置
2. 使用核心配置文件application.properties
application.properties application.yml application.yaml
多环境下的核心配置文件的使用(配置文件的命名方式)
- 开发环境:application-dev.properties
- 测试环境:application-test.properties
- 准生产环境;application-ready.properties
- 生产环境:application-product.properties


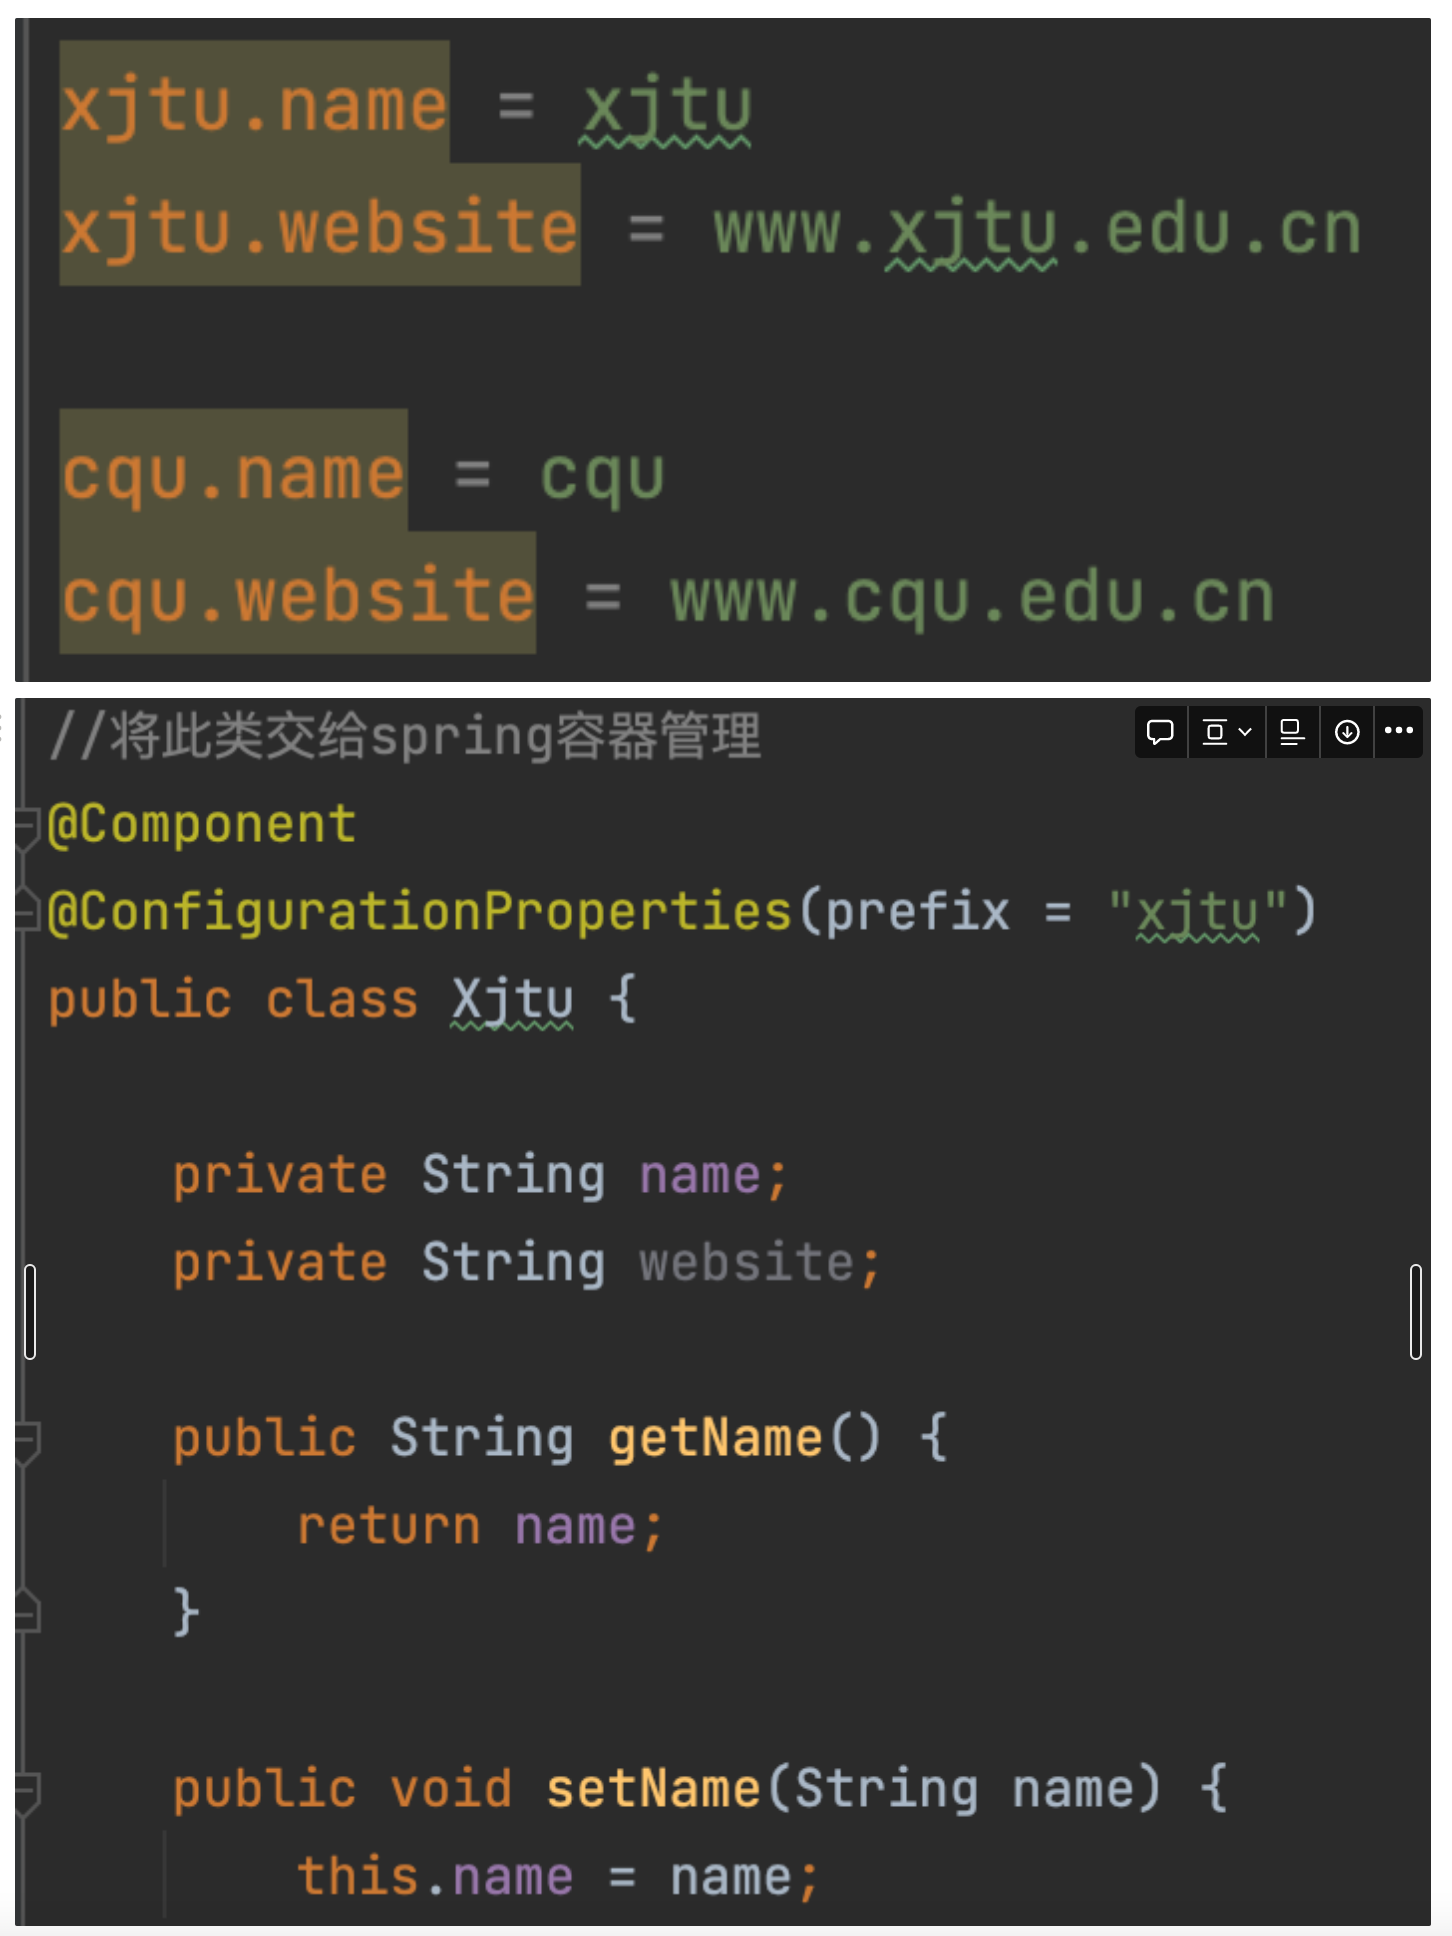
3. 在核心配置文件中自定义配置,并将自定义配置映射到对象

注意核心配置文件中的命名方式,xx.xx
右上是实体类文件
右下是controller文件

4. 集成jsp
首先是pom.xml中加入jsp解析依赖
<!--引入springboot内嵌tomcat对jsp的解析依赖,不添加解析不了-->
    <!--        仅仅只是展示页面-->
    <dependency>
        <groupId>org.apache.tomcat.embed</groupId>
        <artifactId>tomcat-embed-jasper</artifactId>
    </dependency>
设置jsp页面资源文件夹webapp:019-案例10-springboot集成jsp-1_哔哩哔哩_bilibili
controller中
@RequestMapping(value = "/sayjsp")
public ModelAndView sayjsp(){
    ModelAndView mv = new ModelAndView();
    mv.addObject("message", "hello,springboot");
    mv.setViewName("sayjsp");
    return mv;
}
5. 集成Mybatis
1. 添加MyBatis依赖,MySQL驱动
<!--        mysql-->
        <dependency>
            <groupId>mysql</groupId>
            <artifactId>mysql-connector-java</artifactId>
            <version>8.0.22</version>  //注意:需要指明版本号
        </dependency>
    <!--        mybatis整合框架起步依赖-->
        <dependency>
            <groupId>org.mybatis.spring.boot</groupId>
            <artifactId>mybatis-spring-boot-starter</artifactId>
            <version>2.1.4</version>
</dependency><!--mybatis 代码自动生成插件-->
<plugin>
<groupId>org.mybatis.generator</groupId>
<artifactId>mybatis-generator-maven-plugin</artifactId>
<version>1.3.6</version>
<configuration>
<!--配置文件的位置-->
<configurationFile>GeneratorMapper.xml</configurationFile>
<verbose>true</verbose>
<overwrite>true</overwrite>
</configuration>
</plugin>- 使用MyBatis提供的逆向工程生成实体bean,映射文件,DAO接口
- 自动生成的配置文件:GeneratorMapper.xml
- 使用插件自动生成(注意自动生成可能会在Mapper.xml生成两遍相同代码,会出错)

- 注意数据库字段名最好使用下划线形式,下面是截取Bookmapper.xml的部分(注释是笔记)
<!--  id 标签只能修饰主键字段-->
<!--  result 修饰除了主键以外字段  -->
      <!--column 数据库中的字段名称
      property 映射对象的属性名称,因此最好是将数据库的字段名称写成下划线形式 b_id,这样会转换成驼峰命名
      jdbcType 列中数据库中字段的类型(可以省略不写)
      -->
<!--    resultMap的作用:
        1.数据库与映射对象的属性名不一致,可以进行转换
        2.当查询的结果没有一个表的时候,可以自定义一个结果集-->
    <id column="bID" jdbcType="INTEGER" property="bid" />
    <result column="bName" jdbcType="VARCHAR" property="bname" />
    <result column="bPrice" jdbcType="DOUBLE" property="bprice" />
    <result column="bAuth" jdbcType="VARCHAR" property="bauth" />
    <result column="bDate" jdbcType="DATE" property="bdate" />
    <result column="bNum" jdbcType="INTEGER" property="bnum" />
    <result column="categoryID" jdbcType="INTEGER" property="categoryid" />
    <result column="pID" jdbcType="INTEGER" property="pid" />
  </resultMap>
<!--  通过include引用sql语句-->
  <sql id="Base_Column_List">
    bID, bName, bPrice, bAuth, bDate, bNum, categoryID, pID
  </sql>
<!--不用判断""只需要判断null,因为我们使用的封装类型Integer,很好地帮我们规避这个问题-->
  <select id="selectByPrimaryKey" parameterType="java.lang.Integer" resultMap="BaseResultMap">
    select
    <include refid="Base_Column_List" />
    from Book
    where bID = #{bid,jdbcType=INTEGER}
</select>- 指定资源文件Mapper.xml的位置(因为BookMapper.xml没有放在resources路径下)
这里有两种解决方式:
1.映射文件不在resouces下,但是与Mapper接口在同一目录下,则需要在pom中手动指定资源路径,这样才可以编译.xml文件。
<!--        手动指定文件夹为resources-->
<resource>
    <directory>./src/main/java</directory>
    <includes>
        <include>**/*.xml</include>
    </includes>
</resource>
2.将映射文件放在resources类路径下的mapper文件夹中,则需要在核心配置文件中说明,因为.XML与接口文件不在一起,但是不需要在pom文件中指定资源路径:(多数采用)
#指定Mybatis映射文件的路径
mybatis.mapper-locations=classpath:mapper/*.xml- 主要的两个注解@Mapper,@MapperScan
@Mapper 需要在每一个Mapper接口类上添加,作用是扫描DAO接口
@MapperScan 在启动入口类上添加的,扫描所有的包
@MapperScan(basePackages = "com.xjtu.pro002.dao")//开启扫描Mapper接口的包以及子目录
6. 项目结构

7. 支持事务
添加Transactional注解
@Transactional //事务
@Override
public int updateById(Integer id, Book book) {
    return bookMapper.updateByPrimaryKeySelective(book);
}
8. 注解
@RestController//相当于控制层类上加controller+ResponseBody,意味着返回的都是json对象
9. RESTFul风格
@PutMapping(value = "/update/{id}/{name}") //Restful风格 路径中最好是名词 ,
//不是数据库表的字段的参数不需要用斜杠传参数(比如翻页
//请求方式按照增post 删delete 改put 查get来区分
public @ResponseBody int update(@PathVariable("id") Integer id,
                                @PathVariable("name") String name){
    Book book = new Book();
    book.setBid(id);
    book.setBname(name);
    return bookService.updateById(id, book);
}

10. 相关快捷键
快速创建Service接口和为接口创建实现类:option+enter
快速声明对象
//这样的语句,快捷键是:new Book().var然后回车即可
Book book = new Book();
11.关于XML文件
<?xml version="1.0" encoding="UTF-8"?>
<!DOCTYPE mapper PUBLIC "-//mybatis.org//DTD Mapper 3.0//EN"
        "http://mybatis.org/dtd/mybatis-3-mapper.dtd">
<!--在mybatis中,映射文件中的namespace是用于绑定dao接口的,即面向接口编程。当你的namespace绑定接口后,可以不用写接口实现类
mybatis会通过绑定自动帮你找到对应要执行的sql语句-->
<!-- xmlns="http://mybatis.org/schema/mybatis-mapper" -->
<mapper namespace="com.example.page.mapper.UserMapper">
<!--在mybatis中有一个resultMap标签,它是为了映射select查询出来结果的集合,其主要作用是将实体类中的字段与数据表中的字段进行关联映射
注意
当实体类中的字段与数据库表中的字段相同时,可以将resultMap标签中的关联关系忽略不写
当实体类中的字段与数据库中的字段不相同时,就需要在resultMap标签中将实体类字段与数据库字段一一进行关联映射,或者开启驼峰规则,让它自动转换
-->
    <resultMap id="result" type="com.example.page.entity.User">
        <result property="userId" column="userId"/>
        <result property="userDate" column="userDate"/>
        <result property="userName" column="userName"/>
        <result property="userAddress" column="userAddress"/>
    </resultMap>
<!--    ListUser-->
    <select id="ListUser" resultMap="result">
        select * from user
    </select>
<!--    在Mapper.xml中可以通过#{}获取参数:
parameterType控制参数类型
#{}获取参数内容:
1:使用索引,从0开始#{0}表示第一个参数
2:也可以使用#{param1}第一个参数
3:如果参数时对象#{属性名}
4:如果参数是map写成#{key}
#{}和${}的区别:
#{}获取参数的内容支持,索引获取,param1获取指定位置参数,并且sql使用?占位符,${}字符串拼接不使用?,默认找${内容}内容的get/set方法
-->
<!--    findUserByName-->
    <select id="findUserByName" resultMap="result" parameterType="String">
        select * from user
        where userName like concat(concat('%',#{userName}),'%')
        order by userId desc
    </select>
<!--    queryPage-->
    <select id="queryPage" resultMap="result" parameterType="Integer">
        select * from user
        order by userId desc
        limit #{startRows},5
    </select>
<!--    select count(*):查询所有行
select count(0):忽略所有列,统计行数,与列无关-->
<!--    getRowCount-->
    <select id="getRowCount" resultType="Integer">
        select count(*) from user
    </select>
<!--    insertUser-->
    <insert id="insertUser" parameterType="com.example.page.entity.User">
        insert into user
        (userId,userDate,userName,userAddress)
        values
        (#{userId},#{userDate},#{userName},#{userAddress})
    </insert>
<!--    delete-->
    <delete id="delete" parameterType="int">
        delete from user where userId = #{userId}
    </delete>
<!--    update-->
    <update id="Update" parameterType="com.example.page.entity.User">
        update user
        set user.userDate=#{userDate},user.userName=#{userName},user.userAddress=#{userAddress}
        where user.userId=#{userId}
    </update>

</mapper>
resultType和resultMap的区别resultType和resultMap都是 MyBatis 中用于定义结果映射的方式,用于将数据库查询的结果映射到 Java 对象。
- resultType:
resultType是一种简化的结果映射方式,直接指定返回的结果应该映射到的 Java 类型。在 SQL 查询中,可以使用resultType属性指定返回结果映射的类型。例如:
<select id="getUsers" resultType="com.example.User">
    SELECT id, username, email FROM user;
</select>
上述示例中,查询的结果将会被映射到 com.example.User 类型的对象列表。resultType 可以直接指定返回的 Java 类型,但是要求数据库查询的结果列名与 Java 类型的属性名一一对应,保证返回的字段的名字和Java类对象的属性名字完全一样,否则映射会失败。
- resultMap:
resultMap是一种更灵活、可定制性更高的结果映射方式。使用resultMap,你可以定义复杂的映射规则,将数据库查询的结果与 Java 类型之间进行灵活的映射。使用resultMap,你可以指定具体的映射规则,对每个字段进行更细粒度的控制,包括指定列名、属性名、类型转换等。
<resultMap id="UserResultMap" type="com.example.User">
    <id property="id" column="user_id" />
    <result property="username" column="user_name" />
    <result property="email" column="user_email" />
</resultMap>
上述示例中,我们定义了一个 resultMap 名为 “UserResultMap”,将数据库表中的 “user_id” 映射到 Java 类型的 “id” 属性,”user_name” 映射到 “username” 属性,”user_email” 映射到 “email” 属性。
resultMap 具有更高的可定制性,适用于复杂的查询情况,尤其是当数据库查询结果与 Java 类型之间存在差异时,使用 resultMap 可以更加灵活地处理映射关系。此外,使用 resultMap 也可以提高代码的可维护性和可读性,因为映射规则明确地定义在一个地方。


